
Combine un terminal de cable de compresión mediante una combinación documentada de especificación del conductor, serie exacta del terminal, matriz de crimpado y herramienta. A continuación, confirme las instrucciones de preparación, crimpado e inspección para dicha combinación. Un número de tamaño, color, forma de matriz o etiqueta de fuerza de herramienta coincidentes no son suficientes por sí solos.
El resultado debe ser una combinación trazable que pueda entregar a la persona que realiza la terminación. Si falta la información sobre las herramientas aplicables, mantenga la combinación en espera en lugar de elegir la matriz más cercana.
Este es un flujo de trabajo de comprobación de compatibilidad antes del crimpado. Los trabajos en conductores instalados requieren el procedimiento de aislamiento aplicable y personal cualificado. En los lugares de trabajo U.S, OSHA 1910.333 se aborda la desconexión, el bloqueo/etiquetado y la verificación del estado de desconexión. Este artículo no proporciona un método de trabajo con tensión.
Puntos Clave
- Registre el material del conductor, la sección transversal nominal y la construcción, y luego verifique que el terminal exacto los acepte.
- Identifique la serie del terminal así como su modelo. Códigos similares pueden aparecer en diferentes diseños de cuerpo.
- Encuentre la matriz documentada y la herramienta combinada; el tamaño o color de una matriz solo es útil dentro de su sistema de identificación.
- Obtenga la preparación requerida, las ubicaciones de crimpado y las comprobaciones de aceptación antes de comenzar. Mantenga la información faltante visible en el registro del trabajo.
- Un ciclo de herramienta completado o un crimpado de aspecto ordenado no establecen, por sí solos, una terminación aceptable.
Compruebe cuatro enlaces de compatibilidad
Trate la compatibilidad de la matriz de crimpado de terminales de cable como cuatro comprobaciones conectadas. Completar una no resuelve las otras.
| Enlace de compatibilidad | Evidencia para cotejar | Mantener el trabajo cuando… |
|---|---|---|
| Conductor → cuerpo del terminal | Material del cable, tamaño nominal y construcción frente a la especificación del conductor aceptado del terminal exacto | El cable encaja físicamente, pero su material o construcción no está confirmado |
| Cuerpo del terminal → troquel | Serie/modelo de terminal aplicable y el identificador de troquel especificado o sistema de troquel permitido | Solo está disponible un tamaño, color o forma de cavidad similar |
| Matriz → herramienta de crimpado | Modelo exacto de herramienta/cabezal, familia de matrices y cualquier adaptador especificado o configuración de operación | La matriz se puede insertar, pero falta la combinación documentada |
| Lengüeta de conexión → equipo | Disposición de terminal requerida, opción de orificio, ajuste de lengüeta e instrucciones del equipo | Un barril adecuado tiene una conexión de equipo inadecuada |
Para instalaciones de U.S en el lugar de trabajo, OSHA 1910.303 exige que los conectores estén identificados para el material del conductor y que los equipos listados o etiquetados se utilicen de acuerdo con sus instrucciones incluidas. Estos son requisitos específicos de la jurisdicción; utilice las normas del proyecto aplicables en otros lugares.
Paso 1: Registre el conductor antes de elegir el terminal
Comience con la hoja de datos del cable o una identificación fiable del conductor. Registre:
- Material: cobre, aluminio u otra construcción explícitamente identificada.
- Nominal size: retain the stated mm² or American Wire Gauge (AWG) designation.
- Construcción: the declared conductor class or strand configuration, including compact or sector-shaped construction where relevant.
- Any termination-relevant finish or treatment identified in the cable documentation.
Do not treat outside cable diameter as conductor area. The insulation diameter describes the cable envelope; nominal conductor area describes the conducting material. Likewise, an approximate AWG-to-mm² conversion does not establish that a connector accepts a substituted size.
When a lug document says only “stranded copper,” resolve any uncertainty about the actual strand construction before proceeding. Do not assume that a fine-stranded flexible conductor, a compact conductor and a conventional stranded conductor are interchangeable because their nominal areas match.
Resultado esperado: one identifiable cable specification that can be compared with the lug documentation. If the conductor construction is unknown, request the cable data rather than selecting a barrel by trial fit.
Step 2: Identify the exact lug series and both interfaces
Record the manufacturer, series, full model and any hole or barrel option. Keep the packaging or batch identification with the job when available.
A tubular compression lug has two distinct interfaces. The barrel receives the conductor; the palm connects to the equipment. The visible form of YOCL SC(JGA) terminales de cable de cobre illustrates this separation, but a product photograph does not supply the tooling specification.
Utilice el Tabla de tamaños de terminales to interpret barrel and mounting dimensions. Keep that mechanical-fit check separate from the documented conductor and tooling match.
A shared model code does not establish a shared die
YOCL publishes both DIN AUS and AUS Thickened copper lug series. Their AUS-16 rows list different barrel dimensions:
| Dimensión publicada | DIN AUS, AUS-16 | AUS Thickened, AUS-16 |
|---|---|---|
| Barrel outside diameter, D | 8 mm | 8.5 mm |
| Barrel bore, d | 6.2 mm | 5.9 mm |
Sources: current YOCL product tables for DIN AUS y AUS Engrosado, checked 24 October 2026. These are first-party dimensional declarations, not independent test results.
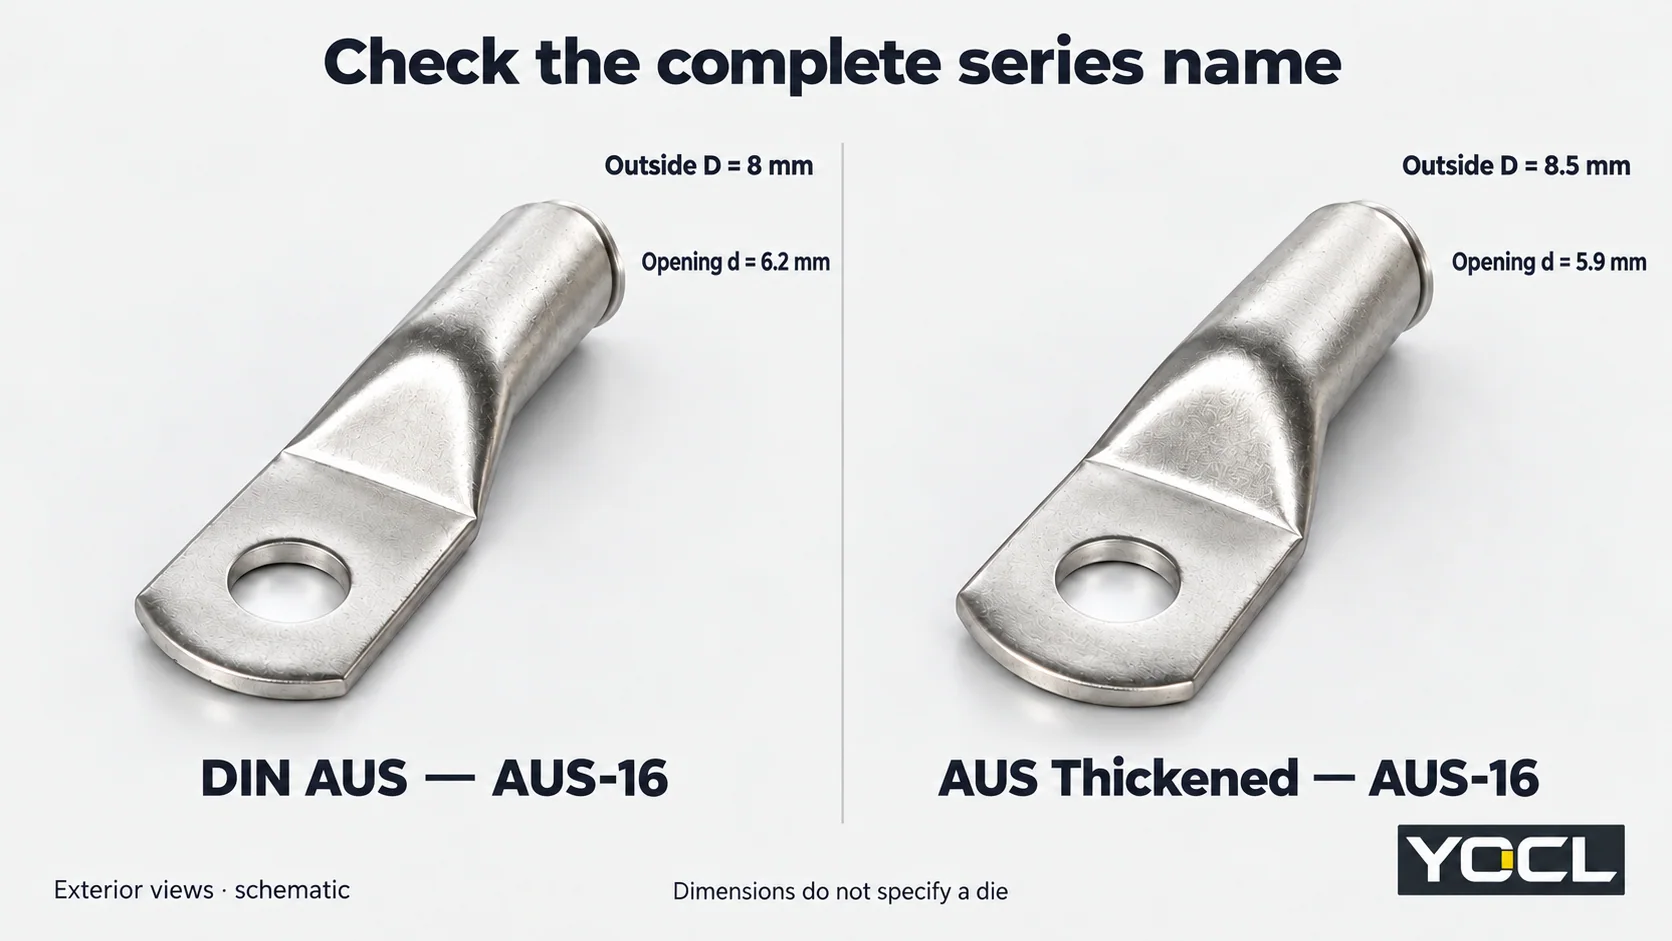
This comparison does not tell you which die to use. It shows why the series name matters. Neither the model suffix nor these dimensions alone establish a permitted conductor area, die cavity or crimping process. Do not calculate a die selection from D or d, or transfer a tooling row from one series to the other without supporting documentation.
Resultado esperado: an exact lug identity with confirmed conductor acceptance and a mechanically suitable equipment interface. For the separate material-transition decision, use Terminales de cable de cobre vs. aluminio vs. bimetálicos.
Step 3: Find the applicable lug–die–tool combination
Obtain the connector manufacturer’s installation instructions, tooling chart or other applicable documented combination. Check its revision and whether it covers the exact lug and conductor identified above.
Read the relevant row across all of its columns and footnotes. The information may include:
| Campo | Qué verificar |
|---|---|
| Lug identity | Exact series/model and any barrel or material restriction |
| Conductor | Accepted material, size and construction |
| Herramienta | Full tool/head designation and permitted configuration |
| Die | Identifier, family, profile and any upper/lower pairing or adapter requirement |
| Process | Required preparation and the specified crimp count, positions or sequence |
| Acceptance | Required inspection, checks and associated records |
If the information is split between a lug instruction and a tool manual, verify that the documents refer to a permitted common combination. A tool’s broad cable-size range describes its stated capability; it does not approve every lug within that numerical range.
An equipment example illustrates why instructions matter: the UL Solutions Deadfront Switchboard Application Guide describes necessary special-tool instructions for certain field-wiring pressure connectors and identification of acceptable terminal assemblies. Its scope is certified deadfront switchboards, and its stated National Electrical Code references are to the 2020 edition. It is not a universal lug tooling chart.
Use markings to locate the instructions
A colour band or die index can help identify a component within the system that defines it. Use it to locate the applicable tooling information. Do not assume the same colour, number or “hex” description means the same combination across brands or series.
Similarly, the force shown on a hydraulic tool does not identify the required die and lug combination. A dieless tool also needs documented applicability; the absence of a removable die does not remove the compatibility check.
If an alternative tool or die is proposed, ask for documentation covering that exact combination. Physical fit in the tool head, similar appearance and a successful practice squeeze are not substitutes for the missing match.
Resultado esperado: a recorded instruction reference linking the actual conductor, lug, die and tool. If any link remains unconfirmed, do not release the job for crimping.
Step 4: Resolve the process instructions before starting
Compatibility includes how the combination is used. Before preparing the conductor, identify the applicable instructions for:
- stripping and conductor preparation;
- insertion and any method of verifying it;
- surface treatment or compound, where specified;
- die orientation and the required crimp locations, count and sequence;
- tool-cycle completion and tool condition checks;
- inspection and any required qualification or sample testing.
A barrel cavity length is not automatically the strip length. A longer barrel does not automatically require an extra crimp, and a visually broad flat area does not identify where the die should act. Obtain the actual instructions for those decisions.
Do not trim strands, fold the conductor, add filler, change a die or add another compression to compensate for an unresolved mismatch. Stop and obtain an instructed solution. These changes alter the termination you were supposed to verify.
If the tool’s required condition check or service status is unresolved, set it aside until the tool instructions and your quality process are satisfied. Do not invent a common calibration interval for every hydraulic, mechanical or battery tool.
Resultado esperado: the operator has an applicable process and acceptance criteria before the first production crimp. This article supplies the verification sequence; the actual preparation and tool operation come from those instructions.
Step 5: Separate tool completion, inspection and restoration
After the documented crimping process is performed, check the work against its specified acceptance criteria. Three questions remain distinct:
| Comprobar | What it establishes | What it does not establish alone |
|---|---|---|
| Was the specified tool cycle completed? | The recorded tool operation reached its prescribed end state | That the conductor, lug and die were correctly matched |
| Does the termination meet its inspection criteria? | The required visible features and other specified checks were assessed | Unspecified electrical performance or certification |
| Is the equipment termination ready for service? | The equipment-side connection and required installation checks are complete | Automatic restoration authorization from the crimp’s appearance |
Inspect the features required by the instruction, such as insertion evidence, conductor condition, crimp position and any specified identifying impression. A neat hexagonal outline cannot establish all of these. A hand tug is not a substitute for a specified pull test or its acceptance criteria.
Where the applicable quality plan requires sample, destructive or electrical testing, use its method, sampling rules and limits. This workflow supplies no universal pull force, resistance threshold or number of test samples.
If a termination fails inspection, segregate it and follow the authorized disposition. Do not assume that another squeeze will repair it. Replacement, rework or further assessment depends on the actual instructions and condition.
The palm-to-equipment connection still needs the specified hardware, arrangement and fastening instructions. Restore service only through the equipment’s authorized procedure after the required checks are complete.
Keep a match record with the termination job
Use this record for each distinct combination. Link it to the relevant work order or termination schedule so an inspector can trace the installed parts to the instructions used.
| Campo del registro | Entry to retain |
|---|---|
| Cable | Manufacturer/type, material, nominal size and declared construction |
| Lug | Manufacturer, exact series/model, relevant option and batch identification where available |
| Tool and head | Exact model/configuration and equipment identity |
| Die or dieless setting | Required identification/configuration from the applicable instructions |
| Authority for the match | Document title, revision, page/table/row and any footnote |
| Process requirements | Preparation, crimp locations/count/sequence and specified tool checks |
| Requisitos de aceptación | Inspection criteria and any required test/qualification reference |
| Job result | Operator/inspector record, required results and unresolved deviations |
Use clear decisions:
- Hold: a required specification, documented combination, instruction or tool condition is missing.
- Refer for review: documents conflict or a substitute component/process is proposed.
- Ready for the documented crimping process: the matching and prerequisite checks are complete. This does not mean the finished joint has already passed inspection.
For help identifying the relevant YOCL cable lug family, send the exact lug series/model, cable datasheet, proposed die and tool models, and equipment connection drawing. Request the applicable conductor acceptance and tooling instructions before authorizing the termination. For product orientation, return to ¿Qué es un terminal de cable?.
Lecturas relacionadas: Ver installing wire ferrules.
Lecturas relacionadas: cable lug connection overheating checks.
Referencias
- OSHA — 29 CFR 1910.333: Selección y uso de prácticas de trabajo, particularly deenergization and verification provisions; U.S. workplace context.
- OSHA — 29 CFR 1910.303: General, paragraphs (b)(2) and (c)(1); U.S. instruction and conductor-material requirements.
- ELECTRIC — YOCL SC(JGA) terminales de cobre; first-party exterior barrel/palm product information and cover reference.
- ELECTRIC — YOCL DIN AUS copper cable lugs; first-party AUS-16 dimensional data, checked 24 October 2026.
- ELECTRIC — YOCL AUS Thickened copper cable lugs; first-party AUS-16 dimensional data, checked 24 October 2026.
- UL Soluciones — Guía de aplicación de cuadros eléctricos con frente muerto, Wiring terminals and application scope; equipment example, with stated NEC references to the 2020 edition.