
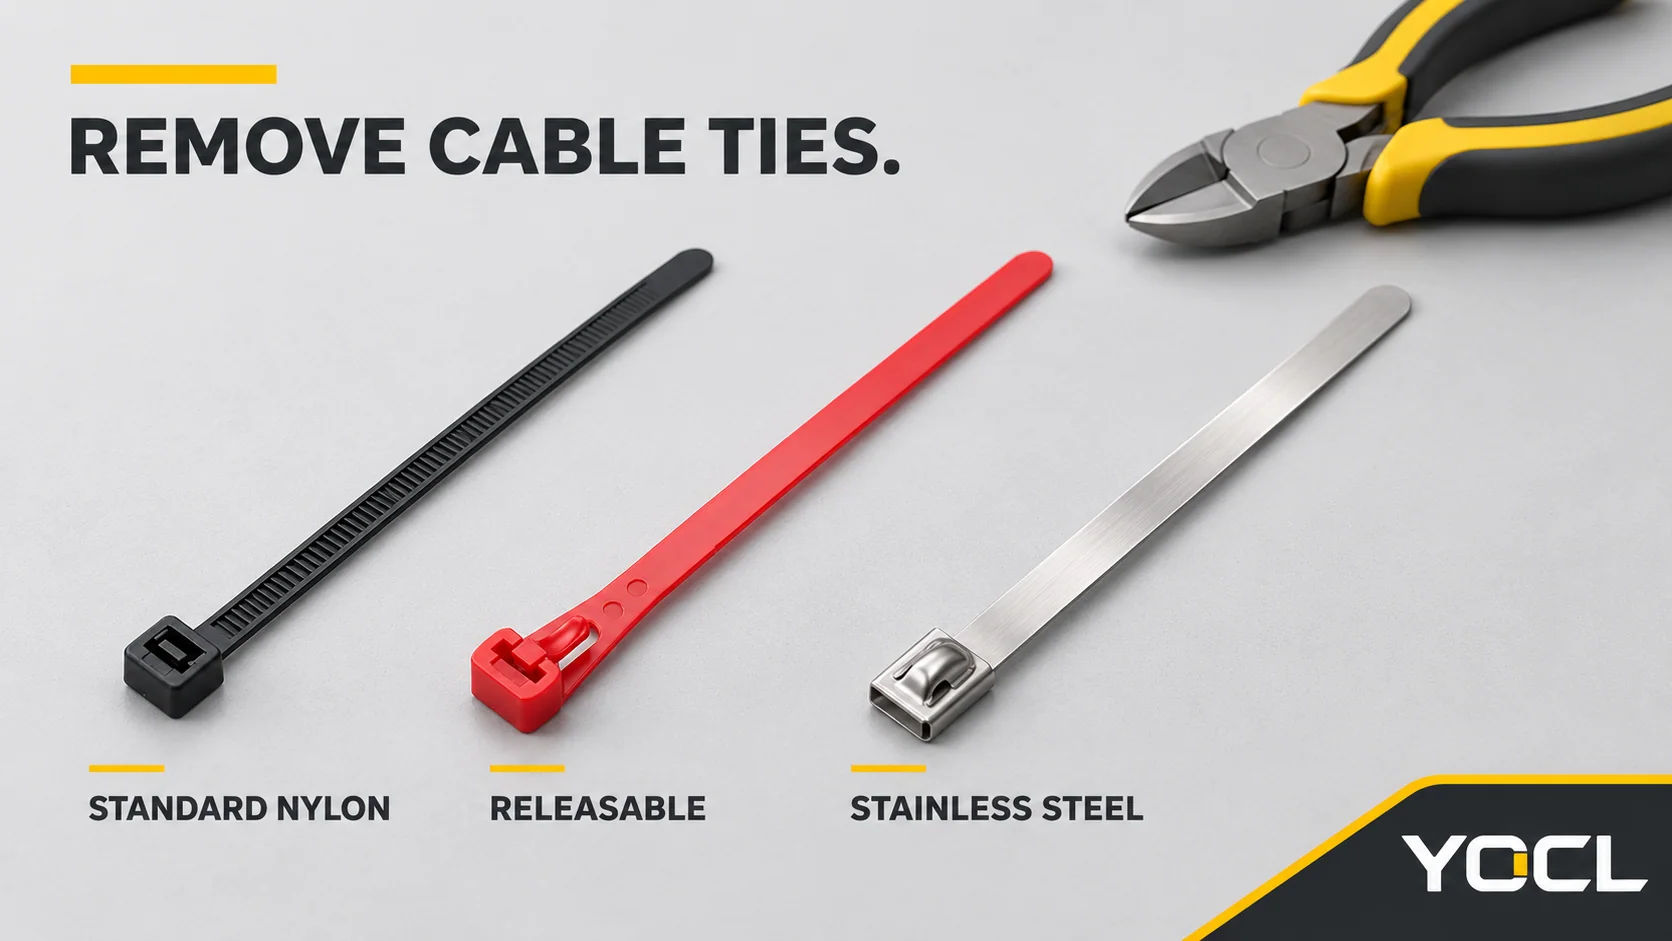
Short Answer: For standard nylon ties, cut an accessible locking head only where the blades can be kept clear of the cables; use a guarded removal tool if safe access requires another cut point. Open releasable ties with their designed release mechanism. Cut stainless bands with stainless-rated aviation snips, tin snips or compatible removal tooling. First isolate electrical hazards and independently support the bundle. Recover the entire tie and fragments, inspect the cables, and replace ties whose condition or reuse suitability is uncertain.
Removing a cable tie is different from trimming its tail during installation. The result should be an intact, supported cable assembly with the old fastening completely removed. A short stub left on an installed tie is not the goal. Identify the material and locking design before choosing a cutting or release method.
Before using any tool: follow the site’s electrical isolation and verification procedure, and arrange independent support for anything the tie is holding. Do not rely on your hand to catch a suspended bundle when the tie opens. If releasing it could drop equipment, move cables unexpectedly or expose electrical hazards, resolve those conditions first. For US workplaces, OSHA’s electrical work-practice requirements address deenergization, lockout/tagout and verification where applicable. This guide does not describe work on exposed energized parts.
1. Why an Accessible Locking Head Can Be the Better Cut Point
In a common serrated nylon tie, teeth on the strap engage a small flexible tongue called a pawl inside the head. The geometry allows tightening while resisting withdrawal. Moving the pawl clear of the teeth can release an accessible mechanism; breaking the head can also interrupt the lock. Neither action establishes that the tie will retain its original performance afterward.
The nylon cable tie types and ratings overview explains the wider family. The pawl sketch below applies to a common construction, not every nylon tie. Metal-barb heads, ladder locks and specialty designs can work differently; do not assume that any visible feature is a release tab.
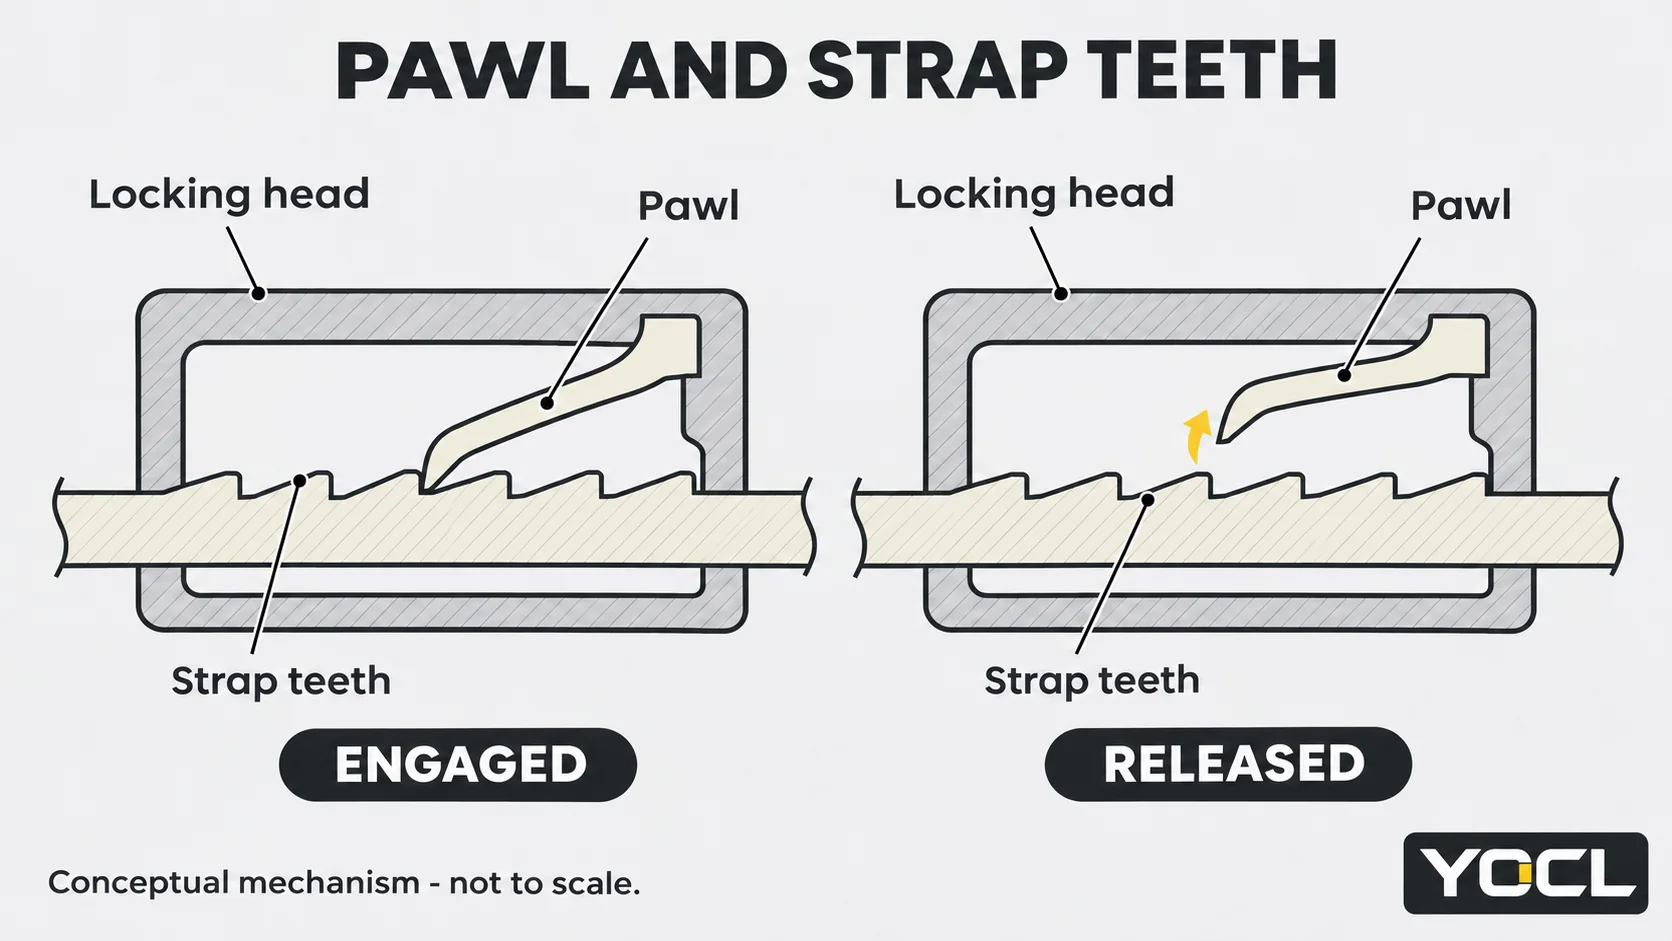
An accessible head can provide a visible cutting target away from the cable jacket. By contrast, forcing an exposed blade underneath a tightly seated strap brings the cutting edge towards the insulation. A partially cut strap can also leave projecting ends that catch hands or scrape adjacent cables while it is being pulled away.
The controlling rule is visible access and separation from the cables, not “always cut the head”. If the head is buried, the jaw cannot surround it, or the cutter would touch the jacket, do not force that position. A purpose-built guarded removal tool may be designed to cut the head or strap while shielding the bundle. Follow its actual instructions and material limits.
Changing the cut point does not remove the need to collect both ends and any fragments. Once the loop is open, lift the old tie out of the assembly rather than dragging a jagged end along the cable jackets.
2. Match the Tool to the Material and Access
The tool needs both sufficient cutting capability and room to operate without entering the cable space. “Flush cutter” describes a cutting geometry, not permission to cut any material. Likewise, a larger handle does not establish stainless-steel capacity.
| Tool | Best for | Do not use for |
|---|---|---|
| Side cutters, also called diagonal pliers | Accessible standard nylon heads or straps within the tool’s stated capability | Blind cuts against insulation; stainless unless the exact cutter is rated for it |
| Flush cutters | Compatible plastic ties where the jaws can fully engage the intended cut | Steel bands with plastic-only or electronics cutters; crushing a head too large for the jaws |
| Aviation snips / tin snips | Stainless bands within the tool’s documented material and thickness capacity | Assuming every pair handles every steel band; cutting with a cable between the blades |
| Pin / small screwdriver | Moving an accessible pawl on a supported, electrically safe assembly when the construction permits it | Cutting ties; forcing unfamiliar locks; probing towards insulation or fingers |
| Guarded tie-removal tool | Repetitive nylon removal where the approved guard or nosepiece separates blade and bundle | Materials or head sizes outside its instructions; assuming its guard fits every assembly |
Arrange the cutting path so it cannot cross a cable or your fingers, and direct exposed cutting edges away from them. There is no single useful “perpendicular to the cables” rule for every cutter shape and access position. A guard only helps if it can be positioned as intended; never force it behind a strap that leaves inadequate space.
For repeated work, evaluate removal tooling specifically. An installation tension-and-cut gun removes excess tail during fastening and is not automatically suitable for cutting an installed loop. Keep those jobs separate.
3. Remove a Standard Nylon Tie in Controlled Steps
Support the Bundle and Plan the Release
Identify what will move when the loop opens. Stabilize the cable route without loading connectors or pulling on individual wires. Where the tie provides mechanical retention, arrange a suitable independent restraint before cutting; a hand placed underneath is not a replacement for that support.
Look around the full loop for a hidden branch wire, another tie or a mounting feature. Make sure that the proposed cut opens the tie you intend to remove. If labels or crowded wiring conceal the blades, improve access before proceeding.
Position the Jaws at an Accessible Head
Where the head is safely accessible, place a compatible cutter around the exposed head section that can be severed without touching the cables. See the jaws and their closing path. Do not drive a jaw underneath the tight loop or press the cable jacket into the blade to obtain a better bite.
If the head does not fit the jaws, use a suitable guarded tool or change the access. Do not twist the head with the cutters as a substitute for a controlled cut; that transfers force into the bundle and makes the result less predictable.
Make a Controlled Cut Without Repeated Gnawing
Keep the offcut and remaining loop controlled without putting fingers in the jaw path. Close a suitable cutter in a deliberate action. Do not repeatedly nibble at a head while pushing towards the wiring, and do not pull the tie until it tears.
As the fastening releases, allow the supported cables to remain in their intended route. Remove the old head and strap without scraping the exposed cut edges over adjacent insulation. Treat small pieces as debris to recover, even if they are difficult to see against the panel finish.
Remove Everything and Inspect the Retained Assembly
Check that the entire loop, head and broken pieces are accounted for. Inspect the jackets at the cut point and around the former contact area for cuts, scratches, pinching or abnormal indentation. Look at individual branch wires, not just the outside of the main bundle. If damage is suspected, stop and have the cable assessed under the applicable maintenance procedure; a new tie does not repair insulation.
If the fastening also passes through a base, distinguish removing the tie from detaching the base. Review cable tie mounts and their attachment interfaces before disturbing a base that will be reused. Check its tie passage and attachment condition during reinstatement.
If the tie will not cut: stop and check capacity, jaw opening, blade condition and access. Replace the cutter with a tool suited to the material and head size, which may require a larger-capacity cutter or guarded removal tool. Do not simply squeeze harder, lever against the cable or use brute force to snap the strap.
4. Undoing a Tie Without Cutting: Designed Release Versus Forced Opening
Use a Releasable Tie’s Own Mechanism First
A releasable tie may have an extended lever, a tab or another purpose-designed latch. Identify that feature and its intended movement. With the assembly supported and the tie no longer carrying the working load, operate the release and ease the strap back through the head. Avoid tightening it further just to gain access to the latch.
Do not assume that every reusable tie requires a pin. A built-in release can make a separate pointed tool unnecessary. If the mechanism is inaccessible, jammed or cracked, do not probe blindly or force the housing open. Improve access or replace the tie using an appropriate controlled removal method.
Lifting a Pawl on an Ordinary Nylon Tie
Some ordinary serrated ties can be opened by moving the small pawl away from the strap teeth with a fine pin or small screwdriver. The physical principle is that the tongue no longer blocks backward strap travel. It is not a release method for steel ball locks, metal-barb heads or every specialty plastic lock.
Only consider this where the assembly is independently supported, electrical hazards have been isolated, and the pawl and tool tip are clearly visible. Keep the tip contained within the accessible head opening, away from fingers and cable jackets. Gently move the tongue clear of the teeth while easing the strap backwards. If it does not move readily, stop; digging deeper or bending the pawl harder can damage the lock and let the tool slip.
This is a possible removal technique for an accessible construction, not an endorsement of ordinary ties as reusable fasteners. The technical disclosure of a pawl-release mechanism illustrates the engagement principle; it does not establish present-day compatibility or performance for another tie.
Opening Is Not Proof of Reusable Strength
Inspect the strap teeth, pawl and head after release. Rounding, gouges, whitening, cracks or a latch that no longer returns normally are reasons to discard it. A visual check cannot restore or demonstrate the original strength of a standard single-use tie opened by force.
Do not reuse such a tie for load-bearing retention, critical cable support or another duty where release would matter. Reuse candidates should be ties designed and permitted for reopening, still suitable for the actual service, with an intact and functioning release/lock. When those conditions cannot be established, fit a new tie.
5. Remove Stainless Steel Ties with Material-Rated Cutting Tools
Use aviation snips, tin snips or a dedicated removal tool expressly suitable for the stainless band and its thickness. Do not use plastic-only flush cutters or electronics snips. A steel band’s width alone is not enough to establish cutting capability, and an enlarged locking buckle may be harder to cut than the band.
Before cutting, independently support the bundle and identify how the tensioned band could move. Keep your face and hands out of that release path. Use task-appropriate hand protection against cut edges and eye protection where cutting can eject material. Do not put a finger between the band and cables to shield the insulation.
Choose a visible, accessible band section where the approved tool can act without enclosing or contacting a cable. If the band is too close to the jacket for the blades or guard to enter safely, stop and change the access or tooling. Do not pry it away using the cable as a fulcrum. Control the released band and immediately place the cut pieces where their edges cannot injure someone or fall into the cabinet.
Inspect retained cable jackets, supports and adjacent surfaces, including any protective finish that removal may have scratched. If damage needs treatment, use the maintenance requirements for the affected retained part. Do not invent a coating repair to justify reusing a severed band; the cut tie is discarded.
The nylon versus stainless steel comparison explains the material distinction. Once removal and inspection are complete, use How to Tension and Cut Stainless Steel Cable Ties for the separate replacement-installation task. Its tensioning and tail-trimming steps are not removal instructions.
6. When to Replace Instead of Reusing
Choose replacement when condition, design or service history leaves the tie unsuitable. A fastening that can still close is not necessarily fit to return to duty. In particular, reject:
- Worn or damaged teeth: a rounded or gouged engagement surface can no longer be assumed to retain the strap as intended.
- A cracked head or damaged release feature: closing the loop does not repair the housing, pawl or latch.
- Brittle or deteriorated material: cracking during handling, visible damage or other signs of degradation require investigation and replacement.
- A tie stretched by overload: do not straighten a distorted strap and credit it with its former performance.
- Unknown or unsuitable outdoor history: prolonged sun exposure deserves condition and specification checks, particularly when the supplied material and service history cannot be identified.
Outdoor age alone does not provide a universal rejection date. Nor does an intact appearance prove that an exposed tie still meets its original specification. Use Why Do Nylon Cable Ties Break? to investigate material, installation and exposure conditions when failure or deterioration is involved.
For replacement, check the required strength class in the cable tie size and tensile-strength chart, together with the exact model’s dimensions and application requirements. This removal guide assigns no new load rating to a reopened tie and does not reproduce a force table.
If frequent access is planned, specify a suitable releasable design rather than repeatedly forcing a disposable head open. Assess its retention duty and environment separately; being reusable is not itself a support approval.
7. Safety Checks and Common Removal Mistakes
Before returning the assembly to service, confirm that its intended support and routing have been restored, any replacement fastening is installed under its own instructions, and inspection or repair actions are complete. Keep track of which ties were cut, which were released and which parts were retained, especially when more than one person is working on the panel.
Avoid these errors:
- Cutting before supporting the assembly: released cable weight or stored strain can move the bundle and load its connections unexpectedly.
- Pointing a blade or probe towards a jacket or finger: a slip can turn a minor access problem into a cut or puncture.
- Biting or tearing a tight tie: teeth and brute force provide no controlled cutting path and can cause injury or uncontrolled release.
- Using steel or probing tools near exposed live parts: a seemingly small removal task can introduce an electrical contact hazard.
- Treating an installation gun as a removal cutter: its blade and nose may not protect the underlying wires in that operation.
- Leaving a partly severed tie or loose fragments: sharp pieces can injure the next worker, while debris inside equipment can create an avoidable problem.
Collect plastic heads, strap sections and metal offcuts as you work, then inspect the work area before closing the cabinet. Use the site’s suitable cleaning method rather than pushing debris deeper into the equipment. If pieces are missing or a cable may have been struck, resolve that uncertainty before handover.
In US workplaces, OSHA’s eye and face protection requirements and hand-protection requirements address the relevant task hazards. Select protection for the actual work; this article assigns no universal glove grade or electrical protection rating.
FAQ
What is the safest way to remove a cable tie?
First isolate electrical hazards and independently support the assembly. Identify the tie material, then choose a visible cut or release point where the tool cannot contact the cables. An accessible nylon head can be cut with a suitable cutter; purpose-releasable ties should use their release. Recover the complete tie and inspect the retained cables.
Can you undo a zip tie without cutting it?
Yes, some serrated ties can be opened by moving the pawl away from the strap teeth with a pin or small screwdriver, provided the mechanism is accessible and the supported assembly is electrically safe. Stop if the tool or strap resists. The reuse strength of an ordinary single-use tie opened this way is not established; do not reuse it for load-bearing duties.
How do you remove a stainless steel cable tie?
Support the assembly and control the band’s release path. Use stainless-rated aviation snips, tin snips or compatible removal tooling at an accessible band section with the cables clear of the blades. Do not use plastic-only electronics cutters. Recover the sharp band pieces promptly and inspect the retained cables and surrounding surfaces.
Can you reuse a cable tie after removing it?
Consider reuse only for a design intended and permitted to reopen, with intact teeth, head and release mechanism and a suitable service history. Reject cracked, brittle, distorted or worn ties, and discard every severed tie. A standard disposable tie does not regain a verified strength rating because it was opened without cutting; replace it where reliable retention is required.
What tool should I use to cut a cable tie without damaging the cables?
Use a material-capable cutter with safe jaw clearance, or a guarded removal tool matched to the tie and accessible space. Suitable diagonal or flush cutters can remove nylon ties; stainless bands need explicitly stainless-rated tooling. Do not wedge an exposed blade blindly between a tight strap and insulation. If separation cannot be maintained, stop and change access or tooling.
For replacement fasteners, review the YOCL cable tie families and cable ties and fixings category. Identify the required material, locking or release mechanism, dimensions and service conditions before requesting a replacement tie.
References
- US Occupational Safety and Health Administration, 1910.333: Selection and use of work practices, electrical isolation and verification in applicable US workplaces.
- US3584525A: Releasing tool for one-piece cable tie, original technical disclosure of toothed strap and movable-pawl engagement; mechanism evidence, not a reuse rating or universal removal approval.
- US Occupational Safety and Health Administration, 1910.133: Eye and face protection.
- US Occupational Safety and Health Administration, 1910.138: Hand protection.